
Hey man! Is shaky footage ruining your videos? DaVinci Resolve has powerful stabilization tools that can rescue your shaky footage and elevate your videos to the next level. This blog post will reveal how to use DaVinci Resolve to stabilize your shaky video clips in seconds!
Why is Stabilization Important?
Shaky video footage can be distracting and unprofessional. Whether you’re shooting handheld, using a drone, or even just dealing with a shaky camera, stabilization is crucial for creating smooth, watchable videos. Fortunately, DaVinci Resolve offers a range of stabilization options to tackle even the shakiest of clips.
DaVinci Resolve: Your Stabilization Powerhouse
DaVinci Resolve is a comprehensive video editing software that offers a suite of powerful tools, including advanced stabilization capabilities. Whether you’re a beginner or a seasoned pro, Resolve’s intuitive interface and robust features make it easy to smooth out your footage and achieve professional results.

Step-by-Step Guide to Stabilizing Footage in DaVinci Resolve
Ready to transform your shaky videos into silky smooth masterpieces? Follow these simple steps:
- Import Your Footage: Launch DaVinci Resolve and import the shaky video clip you want to stabilize.
- Cut the Clip: Select the portion of the clip that needs stabilization. Press ‘B’ to cut the clip and remove the unwanted portion.
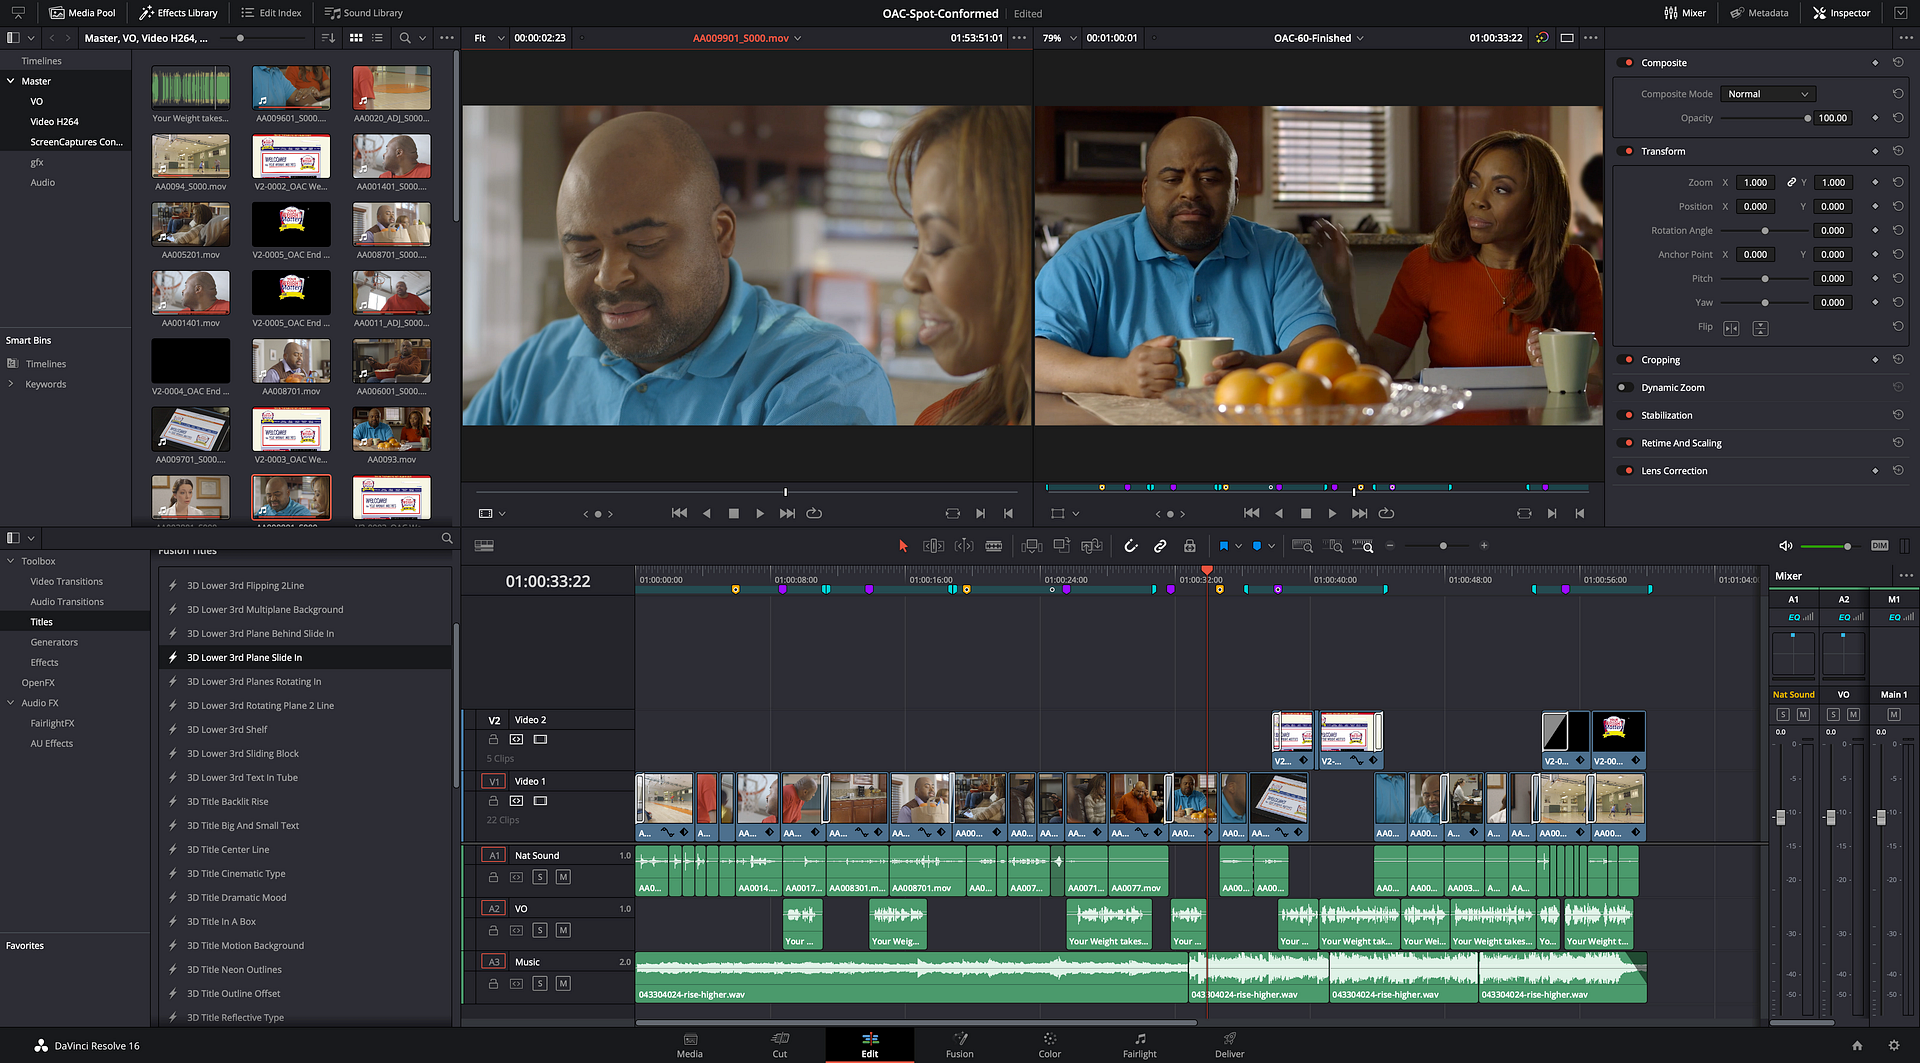
- Navigate to the Inspector: In the Edit page, select the clip you want to stabilize and go to the Inspector panel. If the Inspector isn’t visible, toggle it on.
- Find Stabilization Settings: In the Inspector panel, go to Video and scroll down until you see Stabilization.
- Activate Stabilization: Toggle the Stabilization option to turn it on.
- Choose Your Stabilization Mode: DaVinci Resolve offers three stabilization modes, each with its own algorithm:
- Perspective: This mode uses perspective analysis to determine the best way to stabilize the footage. According to the video, this mode uses “Both Worlds” and often works best.
- Similarity: This mode focuses on maintaining the camera’s original movement while smoothing out the shakes.
- Translation: This mode offers a balance between Perspective and Similarity, providing a general-purpose stabilization solution.
- Experiment with Modes: Each mode has its own algorithm, so experiment to see which one works best for your specific clip.
- Understand Camera Lock and Zoom:
- Camera Lock: This option creates the impression that the camera is fixed on a tripod. It’s a very strong stabilization effect.
- Zoom: This option automatically zooms in on the footage to eliminate any black bars that may appear due to the stabilization process. Toggle zoom on to avoid the black space.
- Stabilize with Camera Lock and Zoom: If you want a super steady shot and don’t mind a slight zoom, toggle on Camera Lock and Zoom, then click Stabilize.
- Adjust Advanced Settings (If Needed): If you want more control over the stabilization process, toggle off Camera Lock. This will reveal additional settings:
- Cropping Ratio: Adjust this to control the amount of cropping applied to the image.
- Smooth: Increase this value for smoother stabilization, but be aware that it may also increase the amount of zoom applied.
- Strength: Adjust the strength of the stabilization effect.
- Fine-Tune and Stabilize: Adjust the cropping ratio and strength to your liking. Click Stabilize to apply the settings. The smoother you make your shot, the more cropping ratio or zoom will be applied.
- Render Cache for Best Results: If you’re not seeing the full effect of the stabilization, go to Playback > Render Cache and select Smart. This will render the footage with the stabilization applied, giving you a more accurate preview. Alternatively, delete the render cache of the selected clips to take effect with the new settings applied.
Pro Tips for Stabilization Success
- Cut Wisely: Before stabilizing, cut out any unnecessary portions of the clip with excessive shaking.
- Experiment with Modes: Don’t be afraid to try all three stabilization modes to see which one yields the best results for your footage.
- Avoid Over-Stabilization: Too much stabilization can make your footage look unnatural and artificial. Aim for a smooth but natural look.
- Consider Wide Angle: If you are on a wide-angle shot, you can zoom in a little bit.
- Gimbal Rule: Never use stabilization on a gimbal. Also, if your camera has in-camera stabilization, it should be stable.
- Slow it Down: Slowing a clip down makes it automatically become smoother.
See it in Action: A Before-and-After Example
To truly appreciate the power of stabilization, let’s take a look at a before-and-after example:
- Split the clip in two.
- Add a video transition such as an Edge Wipe. Set the transition to 1.5, angle to 90, border to 15, and color black.
- Switch off stabilization on the first clip.
- The first clip is now non-stabilized and the second clip is stabilized.
The difference is night and day! The stabilized footage is smooth, steady, and much more professional-looking.
Conclusion
With DaVinci Resolve’s powerful stabilization tools, you can rescue shaky footage and transform it into smooth, professional-looking videos. By following the steps and tips outlined in this blog post, you’ll be well on your way to creating stunning videos that captivate your audience.
FAQs
Which stabilization mode should I use? The best mode depends on the specific characteristics of your footage. Start with Perspective, as it often provides the best overall results. If that doesn’t work, try Similarity or Translation. Experiment to see which mode works best for your clip.
How much stabilization is too much? Aim for a natural look. Over-stabilization can make your footage look unnatural and artificial. If your footage looks too “locked down,” reduce the Strength or Smooth settings.
Why are there black bars around my stabilized footage? Black bars appear when the stabilization process requires cropping the edges of the frame. To eliminate black bars, enable the Zoom option in the Stabilization settings.